
Last reviewed: August 4, 2026.
Pionex Signal Bot connects TradingView strategy alerts to Pionex Futures through a webhook. The setup is to create the signal, connect one tested TradingView strategy, confirm delivery in both logs, and start with risk limits you can afford.
Official reference: Pionex Signal Bot Help Center guide.
Contents
- 1 Before you connect TradingView
- 2 Getting Started with Pionex Signal Bot
- 3 Step 1. Configuring the “Signal” in Pionex
- 4 Step 2. Add a strategy script to the TradingView chart
- 5 Step 3. Configuring the strategy alert on TradingView to connect with Pionex “Signal”
- 6 Step 4. Creating the Signal bot in Pionex with the linked signal from TradingView
- 7 Step 5. Checking if the TradingView signal is sent properly in Pionex
- 8 Step 6. How to add a custom indicator into the strategy script for the Signal bot
- 9 Signal Bot troubleshooting
- 10 Signal Bot FAQ
Before you connect TradingView
- A Pionex account with access to Futures and Signal Bot.
- A TradingView Essential plan or higher so webhook alerts are available.
- A TradingView indicator that includes a functioning strategy and can be checked in Strategy Tester.
- A defined pair, position size, leverage limit, take-profit rule, stop-loss rule, and maximum loss.
Signal Bot executes futures orders. Automation does not remove market, leverage, liquidation, webhook, or strategy risk. Test the alert flow before increasing position size.
Getting Started with Pionex Signal Bot
- You will need a Pionex account to execute the trades. Create Your Free Pionex Account Today!
- You will need a TradingView account with at least an Essential subscription for Alert and Webhook URL access. Register a TradingView account now
- Desktop browser to access the TradingView Pinescript Editor and Signal bot configuration page.
Step 1. Configuring the “Signal” in Pionex
- Log in to your Pionex account (http://www.pionex.com)
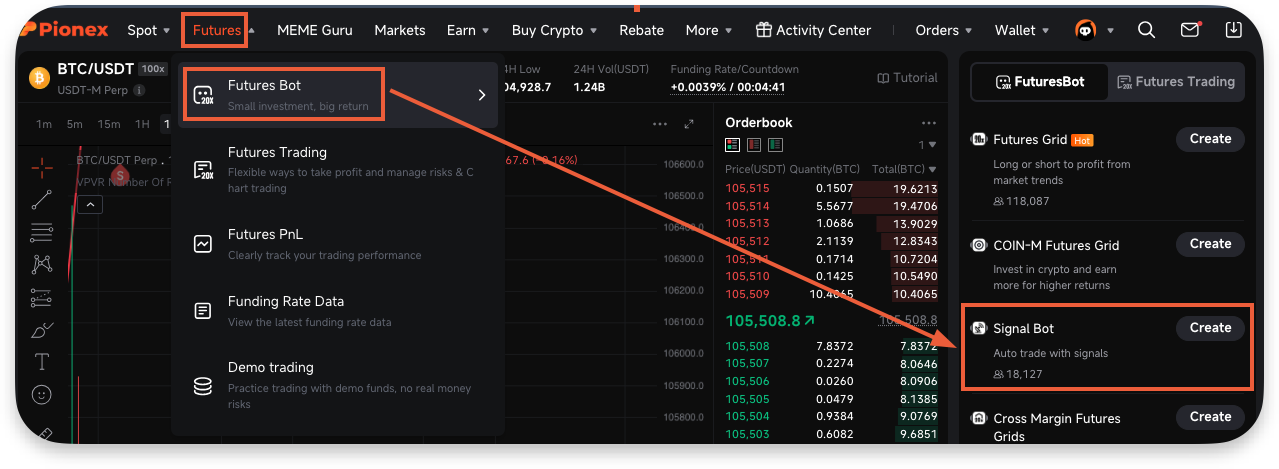
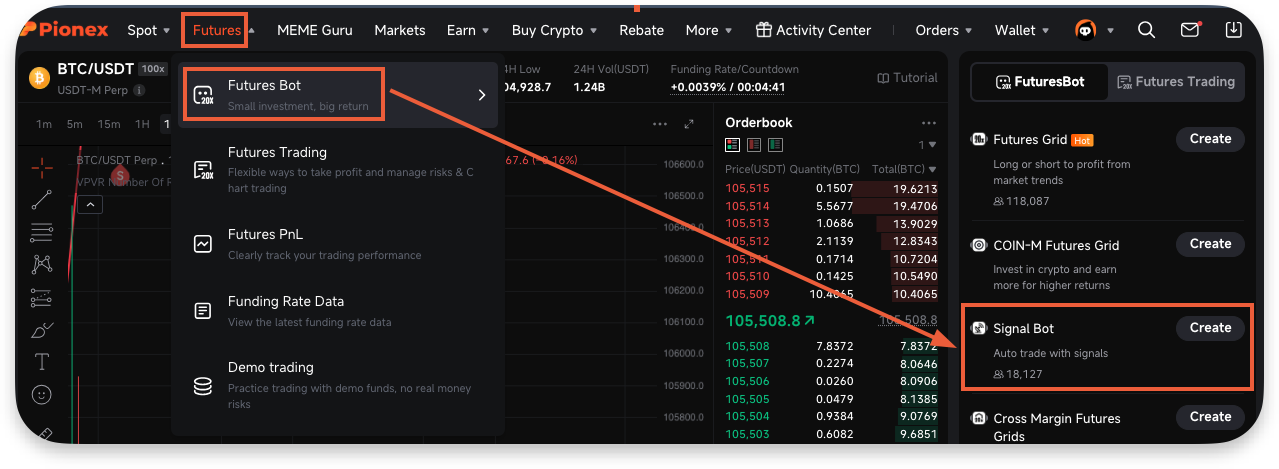
- Navigate to Futures → Futures Bot → Signal Bot
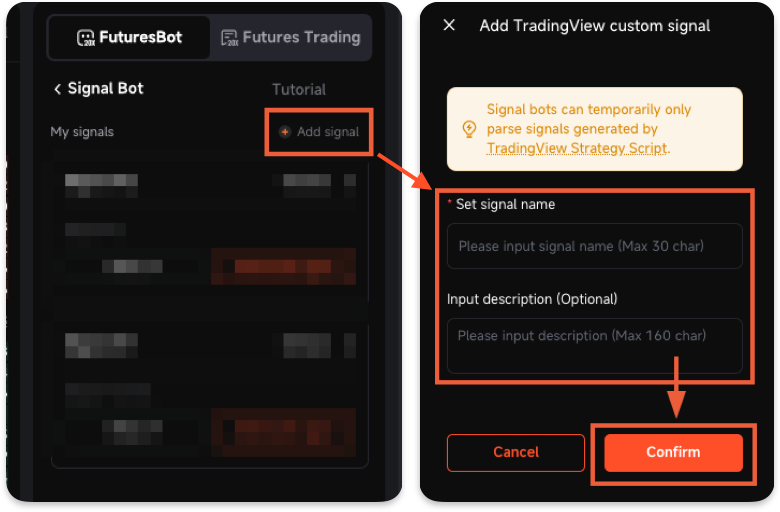
- Click on the “Add signal” button and set the name and description for this signal and then click “Confirm”
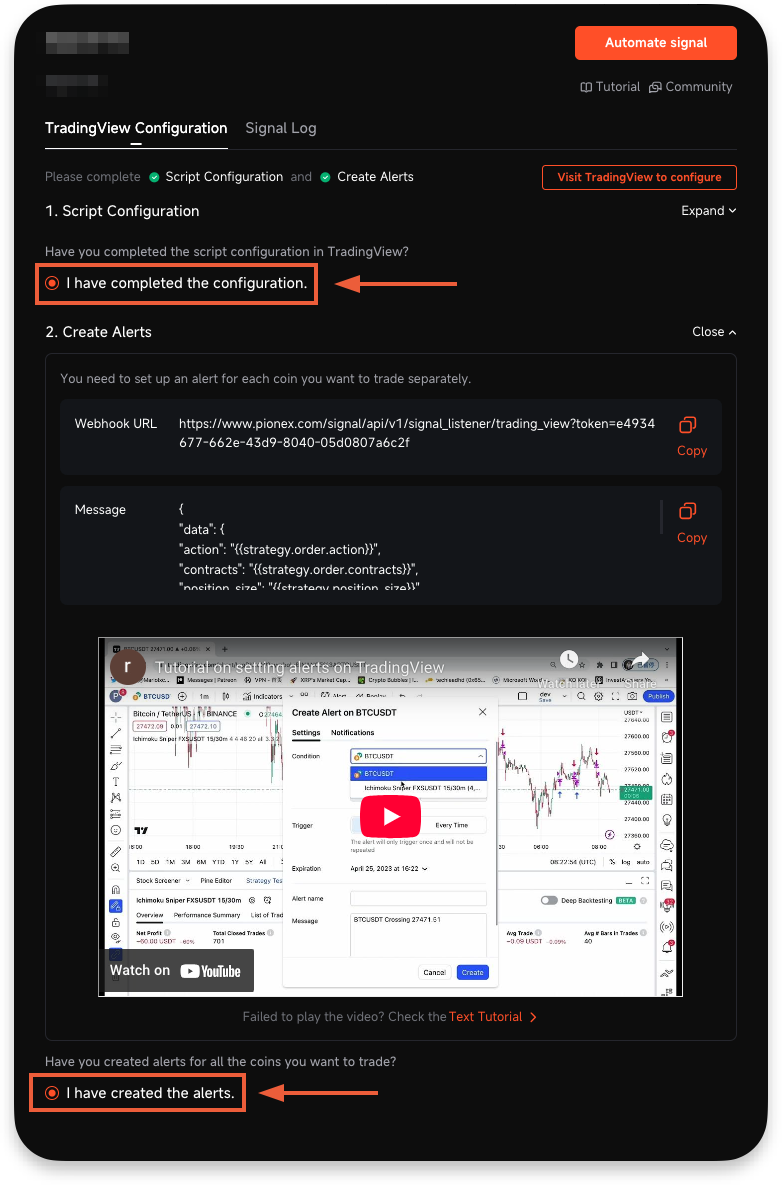
- Once the signal has been created, directly click on the “I have completed the configuration” and “I have created the alert”
- Signal setup on Pionex has been completed.
Step 2. Add a strategy script to the TradingView chart
- Log in to your TradingView account (http://www.tradingview.com/chart)
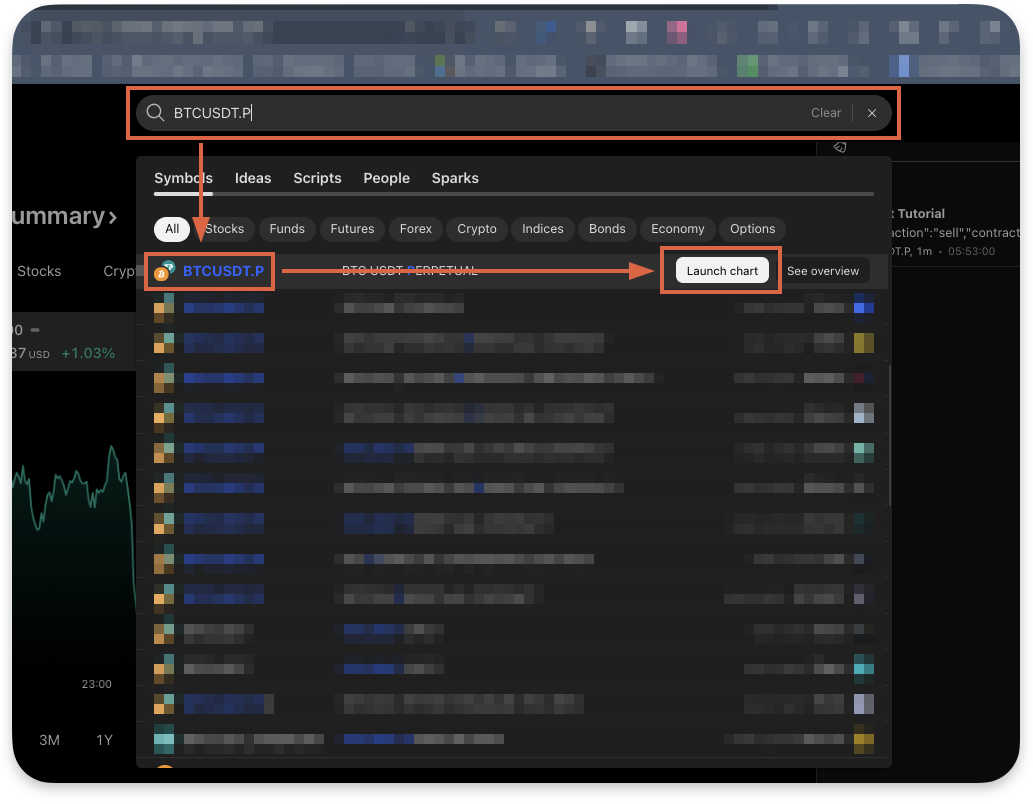
- Choose the desired trading pair under Pionex, and click the “Launch chart“ button
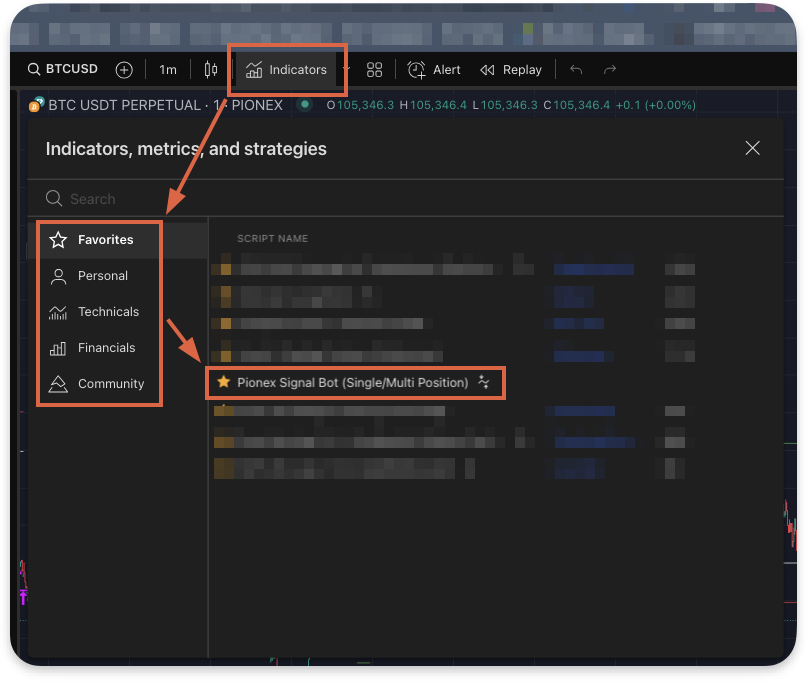
- Click “Indicators”, select the Signal bot script you want to use
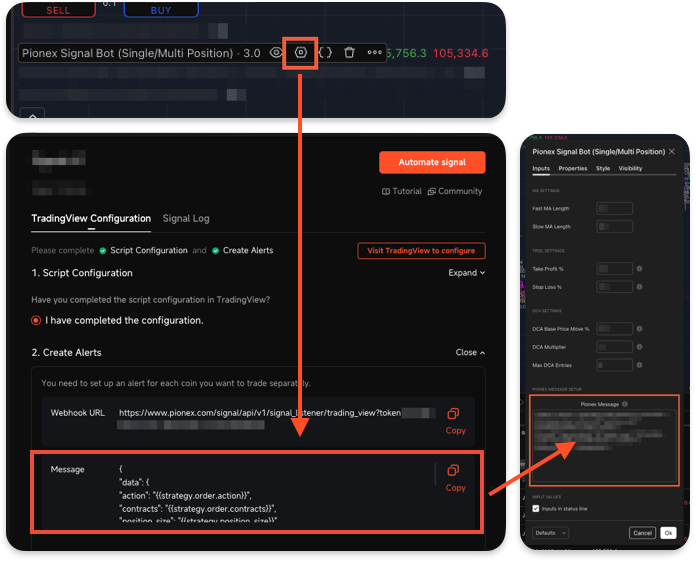
- Click the “Gear” icon to open the strategy settings, on the “Input” tab, copy the “Message” from Pionex into the “Pionex Message” textbox
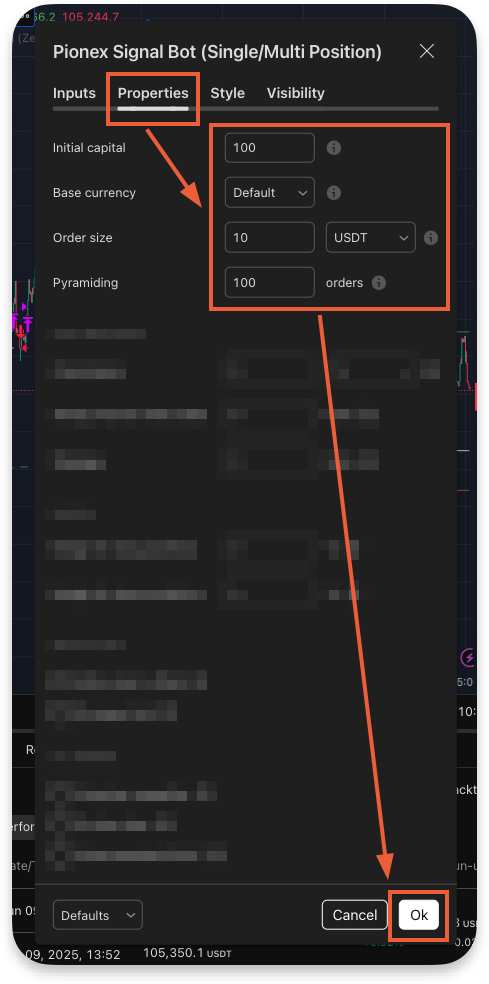
- On the “Properties” settings, refer to the recommended settings as follows:
- Initial capital: Keep this value at “100”
- Base currency: Keep this value at “Default”
- Order size: 1 ~ 100 USDT. Keep the value within 1 to 100 USDT.
“50” USDT will be translated as 50% fund utilization of the Signal bot - Pyramiding: 1 ~ any value. This value is for multi-position entry settings
- Margin for long positions: Keep this value at “0”
- Margin for short positions: Keep this value at “0”
- Other parameters can be ignored as it doesn’t impact the configuration.
- Strategy configuration in the TradingView chart has been completed.
Step 3. Configuring the strategy alert on TradingView to connect with Pionex “Signal”
- Log in to your TradingView account (http://www.tradingview.com/chart)
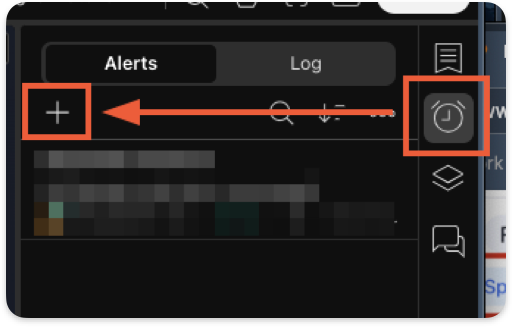
- Click on the “Alarm” icon on the upper right corner, and click the “+” icon to create a new alert
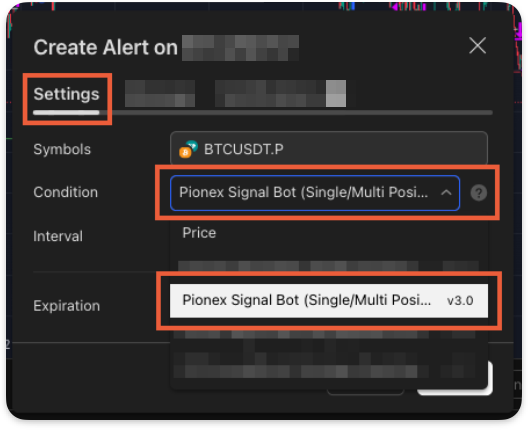
- In the “Settings” tab, choose the desired strategy from the list.
Note: the latest configuration will be at the bottom of the list and needs to be updated every time there are changes to the strategy “Input” configuration.
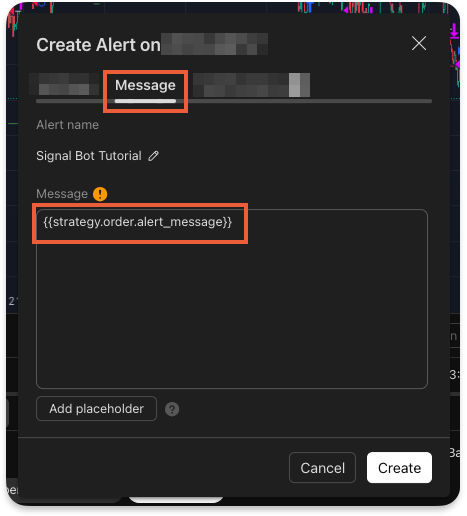
- In the “Message” tab, keep the value unchanged as the default content.
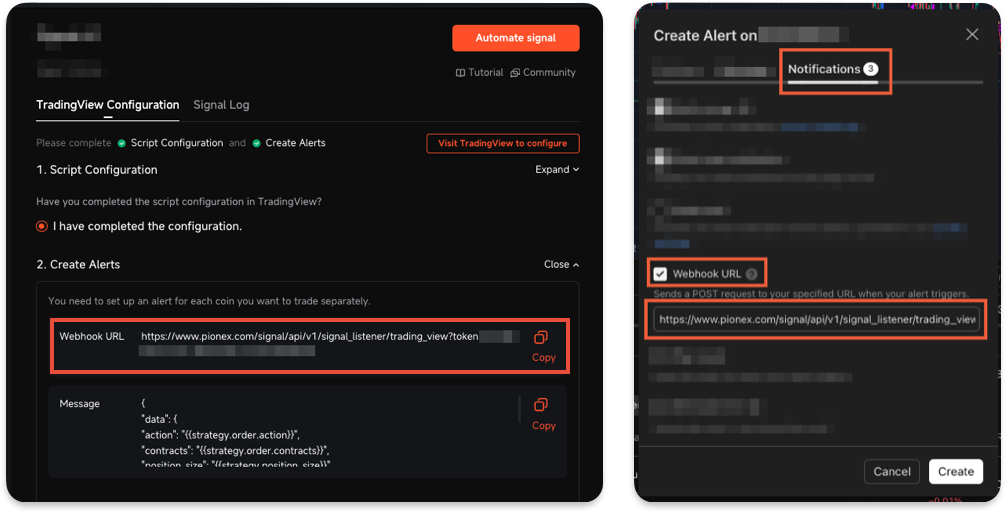
Note: the content will produce the “Message” as a JSON code for the trading instruction. - In the “Notification” tab, enable the “Webhook URL” and paste the “Webhook URL” from Pionex into the “Webhook URL” in TradingView
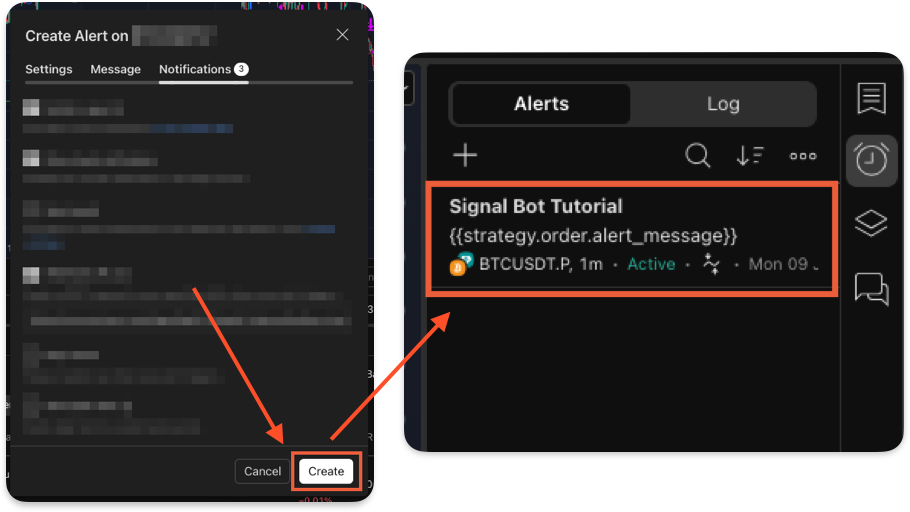
- Click the “Create” button to complete the setup, and the alert will appear in the “Alert” list
- Strategy Alert configuration in the TradingView chart has been completed.
Step 4. Creating the Signal bot in Pionex with the linked signal from TradingView
- Log in to your Pionex account (http://www.pionex.com)
- Navigate to Futures → Futures Bot → Signal Bot
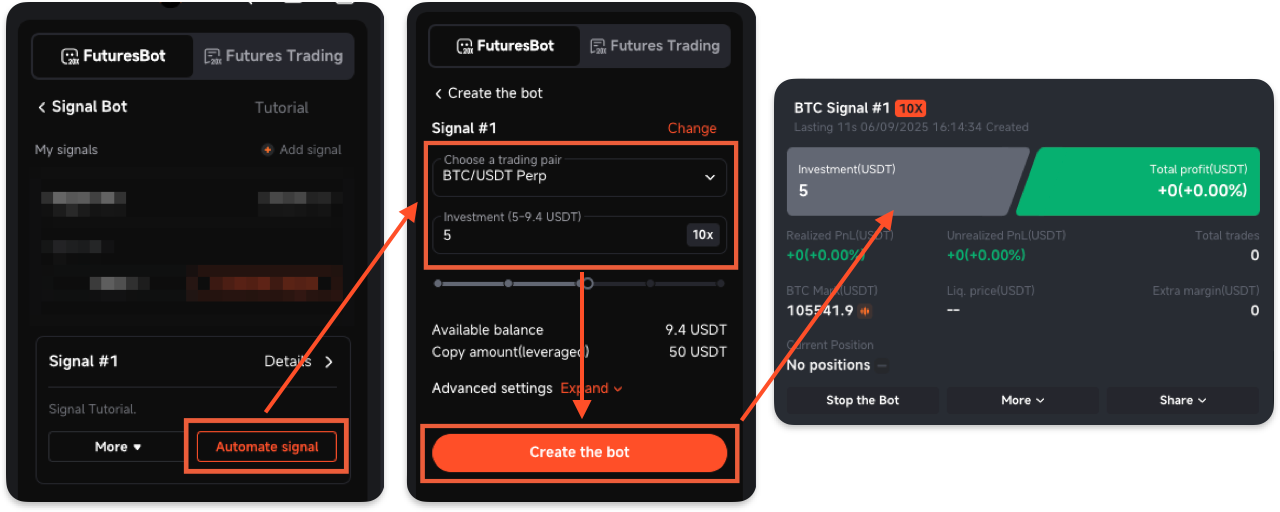
- On the “Signal Bot” page, click the “Automate signal” to configure the bot settings, and then click the “Create the bot”
- Creating the Signal bot in Pionex has been completed.
Step 5. Checking if the TradingView signal is sent properly in Pionex
- Log in to your TradingView account (http://www.tradingview.com/chart)
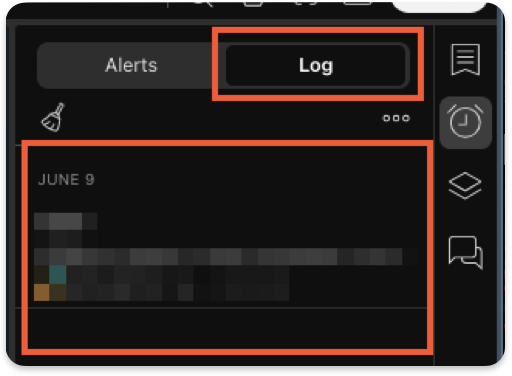
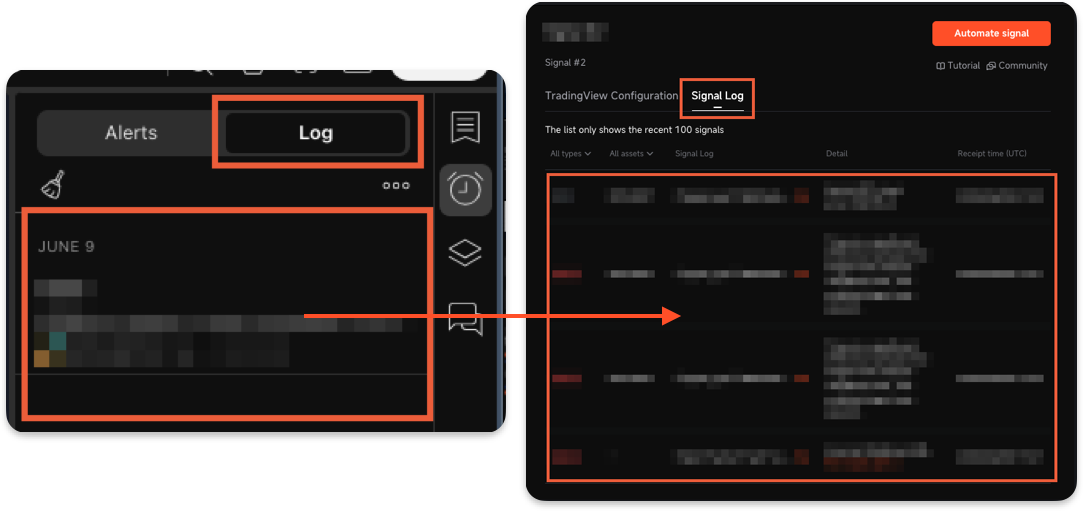
- Click on the “Alarm” icon in the upper right corner, and click the “Log” tab to check the list
- Log in to your Pionex account (http://www.pionex.com)
- Click on “Details” and then navigate to the “Signal Log” tab
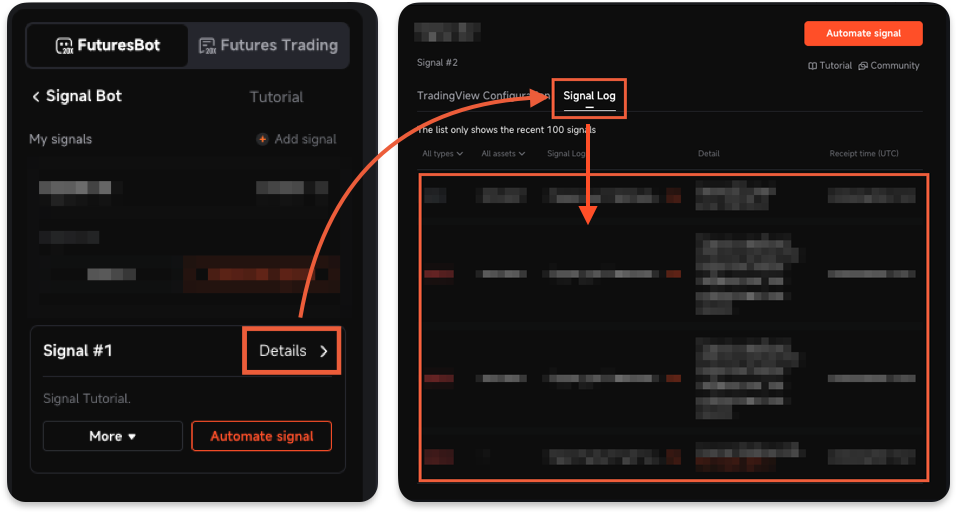
- Compare the TradingView Alert log with the Pionex Signal Log to ensure the signals are received properly
- Use the “Signal Message Calculator” to translate the Message content into an easier-to-understand format.
Step 6. How to add a custom indicator into the strategy script for the Signal bot
- Log in to your TradingView account (http://www.tradingview.com/chart)
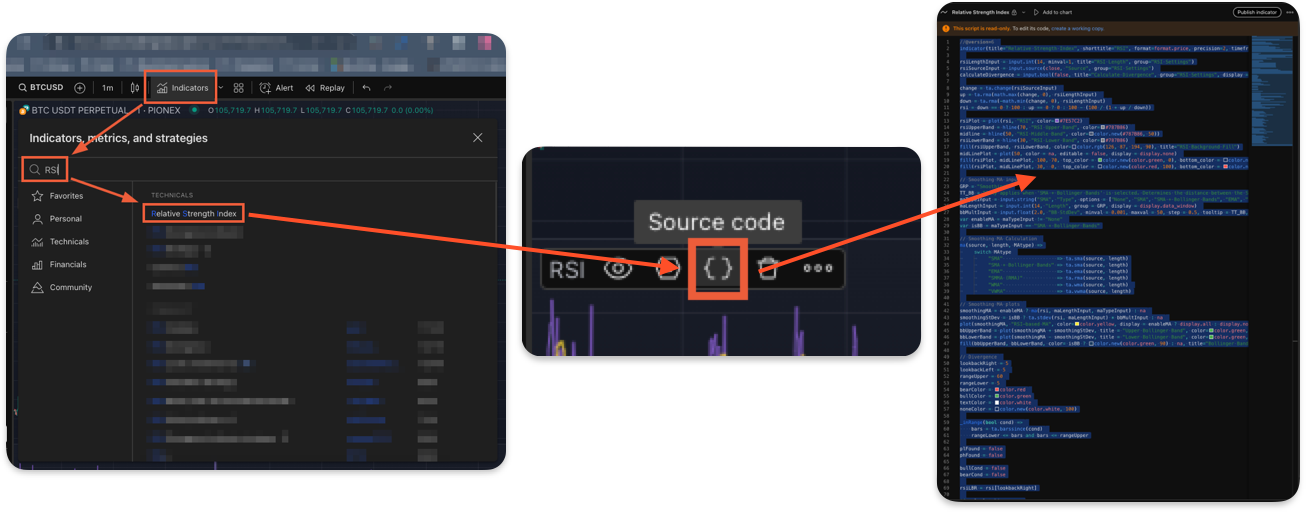
- Obtain the open-source indicator, such as “RSI”, into the TradingView chart, and copy the source code
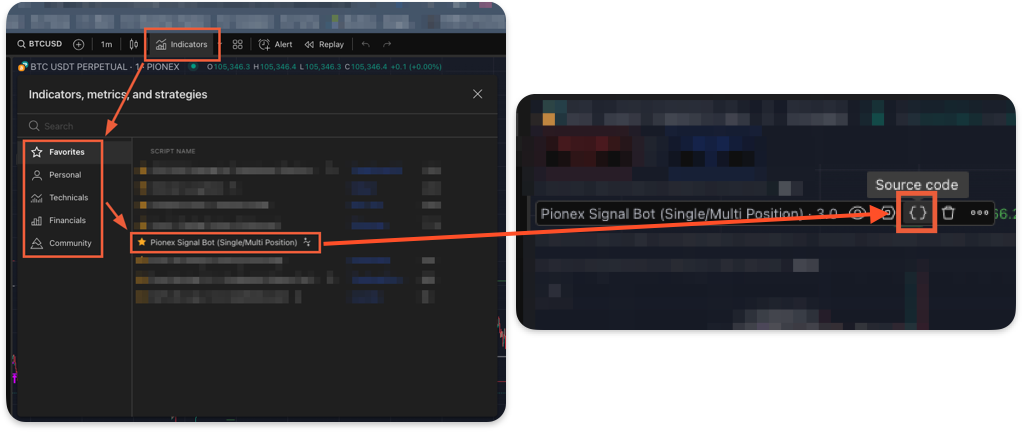
- Open the Pionex Signal bot strategy script, which has been optimized specifically for Pionex
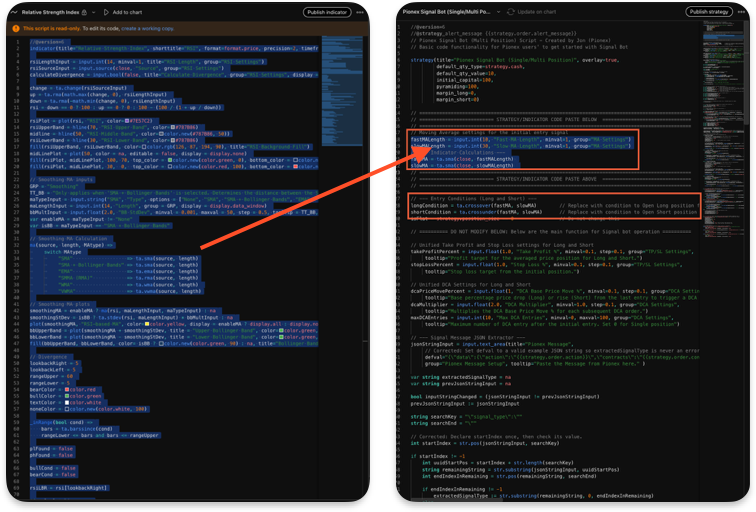
- Paste the custom indicator source code into the specific section for the indicator in the Pionex Signal bot strategy script
- Define the conditions for “Long” and “Short” from the custom indicator into the “longCondition” and “shortCondition” variables
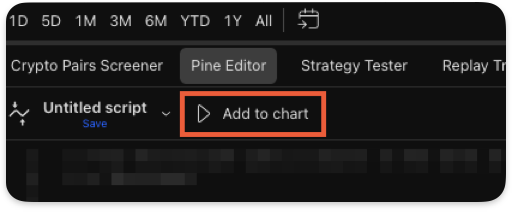
- Click the “Add to chart” or “Update on chart” button to complete the script configuration
- Integrating a custom indicator into the Pionex strategy script has been completed.

Join Pionex Signal Bot community: t.me/pionexapi
Signal Bot troubleshooting
| What you see | What to check |
|---|---|
| No alert in the TradingView log | Confirm the alert is active, the selected strategy is correct, and the alert was recreated after changing strategy inputs. |
| TradingView logged an alert, but Pionex did not receive it | Check that Webhook URL is enabled and that the latest Pionex webhook was pasted without extra characters. |
| Pionex received the signal, but no trade opened | Open the Pionex Signal Log and review the error. Confirm the bot is active, the pair and position mode match, and available margin is sufficient. |
| Order size is different from expected | Review investment, leverage, position-size percentage, current price, and the strategy values sent in the message. |
Signal Bot FAQ
Does Signal Bot work with spot trading?
No. The current Pionex Signal Bot is a Futures product. Using 1x leverage can reduce leverage exposure, but it does not turn a futures contract into spot ownership.
Why did TradingView send an alert but Pionex did not trade?
Compare the TradingView alert log with the Pionex Signal Log. If the signal was not received, check the webhook. If it was received, review the error, bot status, pair, position mode, margin, and order rules.
Should I recreate an alert after changing strategy inputs?
Yes. TradingView alerts use the strategy configuration saved when the alert was created. Recreate the alert after changing important strategy inputs.
Does an automated signal guarantee execution or profit?
No. Signals can arrive late, fail validation, encounter insufficient margin, or perform poorly in live markets. Monitor logs and positions and use strict risk limits.
