
Looking for the latest Pionex AI tools? Pionex.AI is the current workspace for market research, bot guidance, coding, portfolio questions, and support. This tutorial covers the PionexGPT, TradingView, and Signal Bot workflow.
You have a trading idea and you would like to automate trading. Now you can do it with the power of PionexGPT, TradingView, and easy to integrate automated trading with Pionex Signal Bot.
Follow the steps below to enter into a new ERA of automated trading.
- Create a Pine Script code in PionexGPT for TradingView
- Backtest in TradingView
- Execute Automated Trades with Pionex Signal Bot
- Start sending the trading alerts from TradingView to Pionex
Contents
Step 1 – Create your trading strategy with PionexGPT
- Create your strategy by telling PionexGPT what you would like the strategy to perform.
- Enter into PionexGPT the strategy as stated below.
- “Create a strategy using the exponential moving average indicator. Buy when the exponential moving average of 9 is greater than the exponential moving average of 21. Exit a long position when the exponential moving average of 9 is less than the exponential moving average of 21”.
- This will now prompt PionexGPT to create Pine Script Code for your strategy.
- Now copy the code from PionexGPT.
- Go to TradingView PineEditor and click open in the PineEditor.

- Paste your code into the PineEditor, click Save, and then click Add to Chart, and there you have it, your idea into your own personalized trading strategy.

Step 2 – Backtest in TradingView
Next, let’s test the strategy using the power of TradingView BackTesting.
Click on Strategy Tester next to the Pine Editor Tab, and you will see the performance of your strategy.

Adjust the strategy settings and compare results across different coins and time periods. Backtests simulate past performance; they do not guarantee future profits. Include trading fees and slippage, and test on data you did not use to tune the strategy before considering live automation.
Step 3 – Execute Automated Trades with Pionex Signal Bot
Now let’s set up Pionex to accept trading signals from the TradingView Platform.
- Click on Futures– FuturesBot at the top of the Pionex Trading Platform

- You will see the signal bot on the FuturesBot page.

- Click Create On the Signal Bot.
- This will take you to Add a Custom Trading Signal to your Pionex Trading Account. To authorize TradingView to send trades to your account, we need to generate a web address for TradingView to send the code to the Pionex Trading Platform. This web address is specially generated only for your trading account. Think of this as a mailbox where the Postman is delivering mail to your home address.
- We also need to create a secret code, only for Tradingview. This allows Pionex to only accept orders from Tradingview with this secret code. DON’T WORRY. This is made very simple for you. We have done all of the code generation, all you have to do is only copy and paste the code.
- Click on TradingView Custom Signal

- Enter a Name for your Signal so that you can recognize the strategy. As you may have many strategies

- Add any description about the signal for your reference.
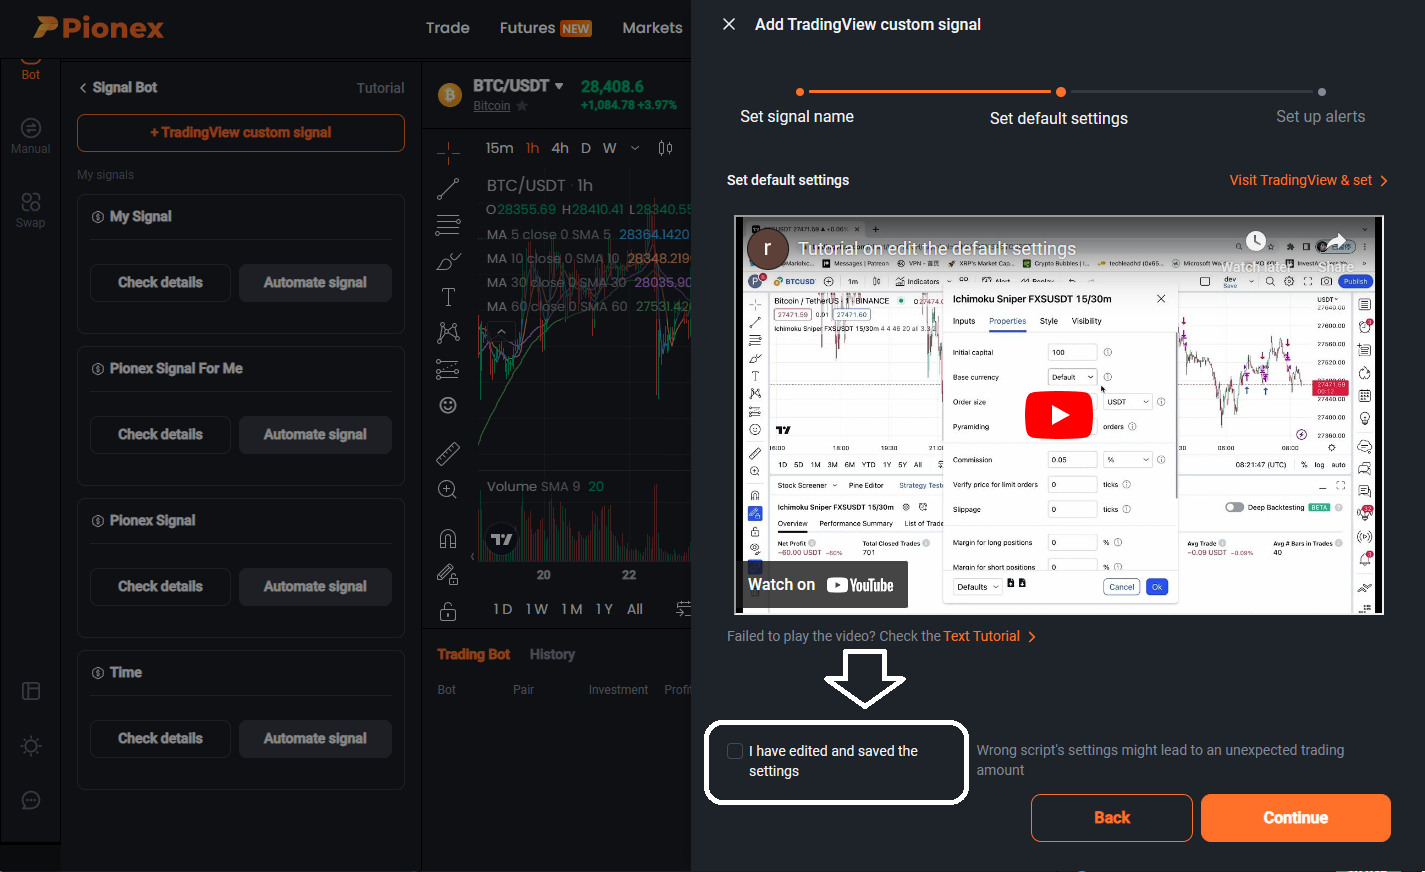
- Click on I have edited and saved the settings and press Continue
- Pionex will Generate the Webhook address for TradingView and the Secret message for Signal for TradingView.
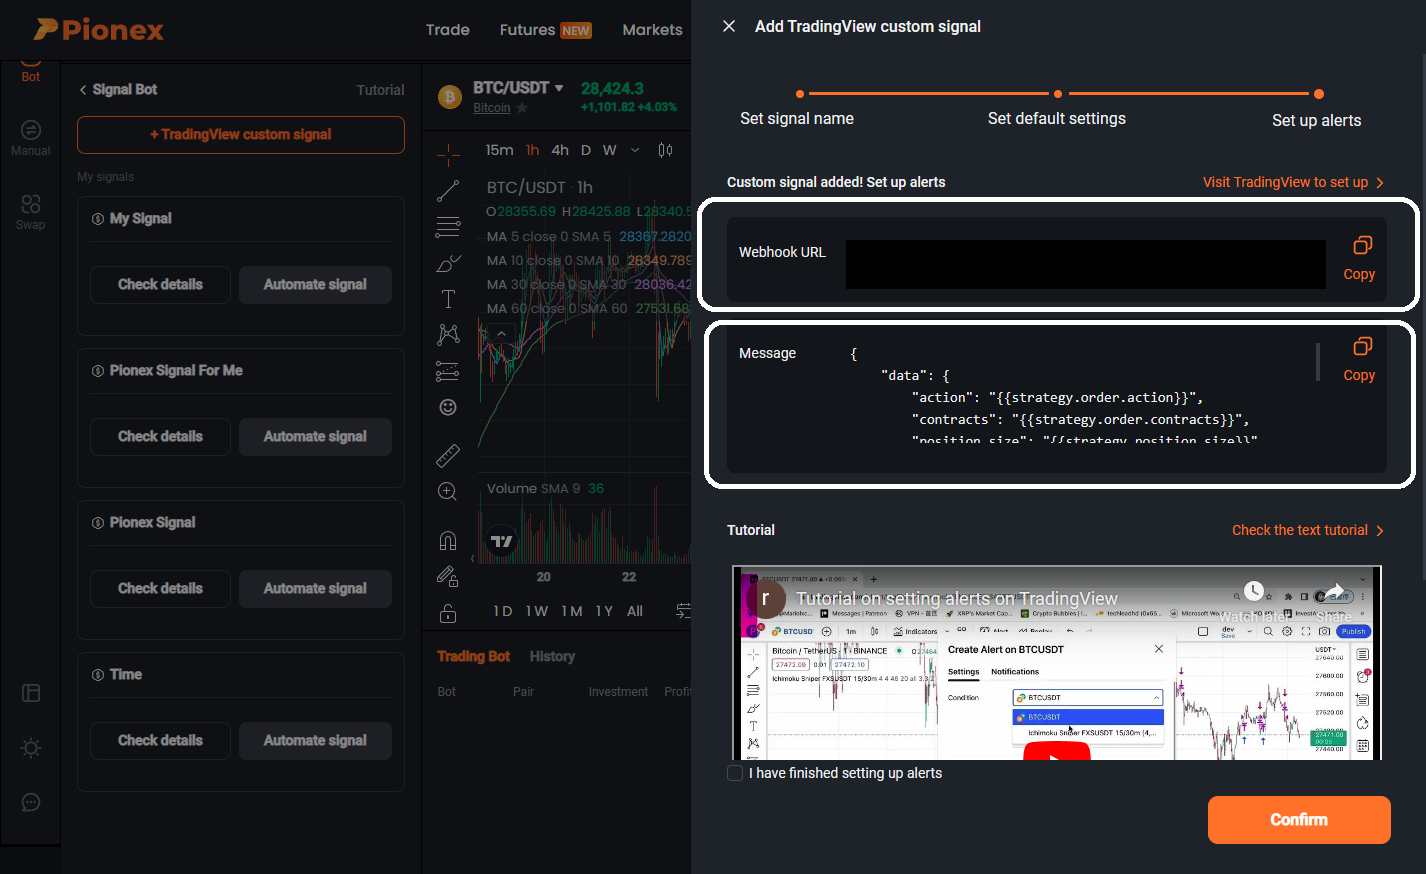
- You have now completed Step 3.
Step 4 – Start sending the trading alerts from TradingView to Pionex
Before starting, enable two-factor authentication (2FA) on your TradingView account. TradingView requires it for webhook alerts. Delivery can sometimes fail, so check the “Webhook status” column in your alert log rather than assuming every signal reached Pionex.
Now let’s tell TradingView to send trades to your account on the Pionex Trading Platform
- Navigate to the TradingView chart where you wish to apply the strategy
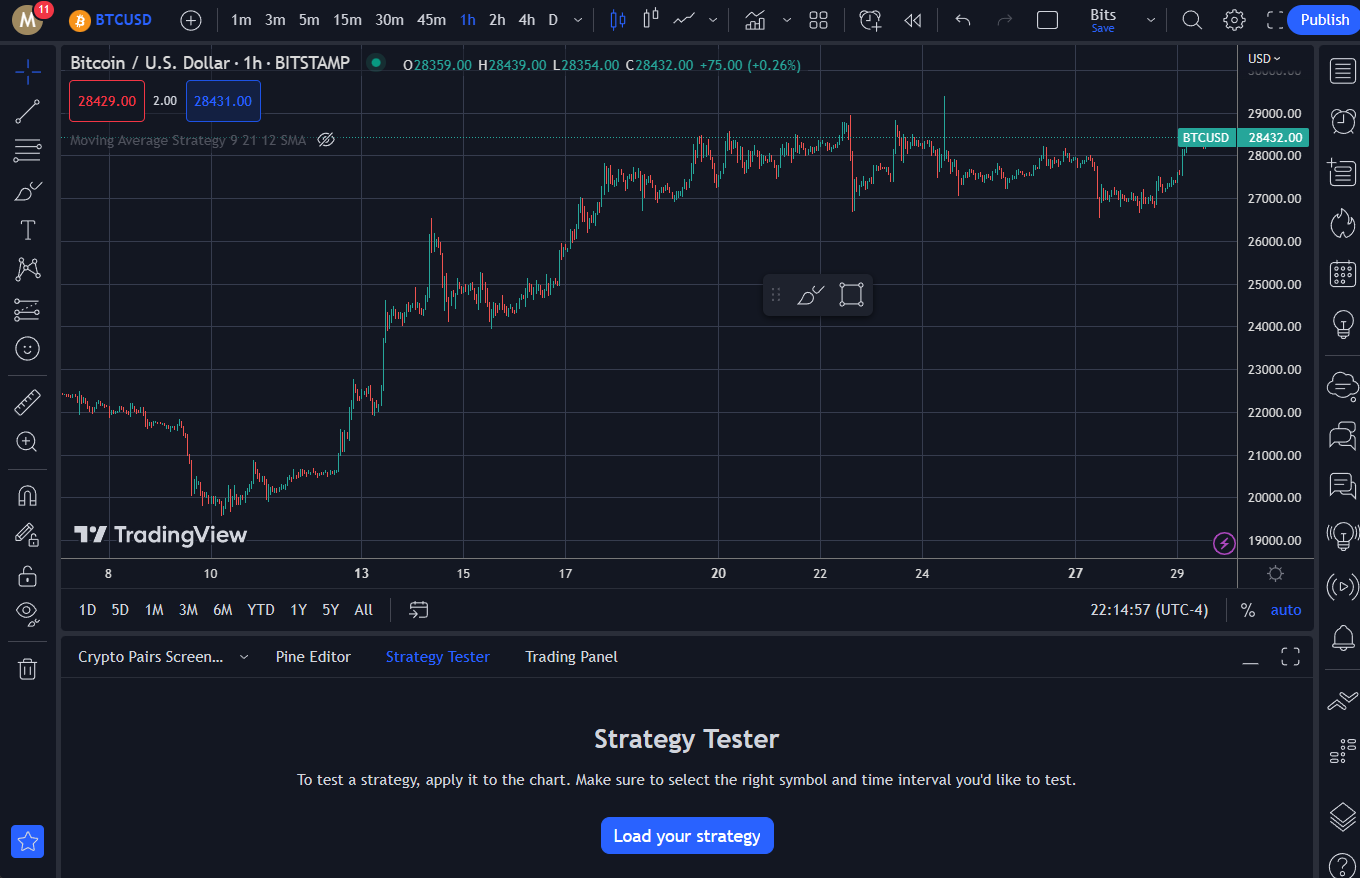
- Select the cryptocurrency that you would like to trade (Pionex signal bot will only execute your strategy in the futures market for now. But while you setting up alerts on TradingView, please use the spot trading pair on an exchange)

- To send a signal to execute the trade in your Pionex account, click on the ‘Alert’ icon located at the top of the TradingView chart

- When setting up the webhook, be sure to select your preferred trading strategy under the ‘Conditions’ section. This will instruct TradingView to use this strategy to generate signals for sending to the Pionex Exchange
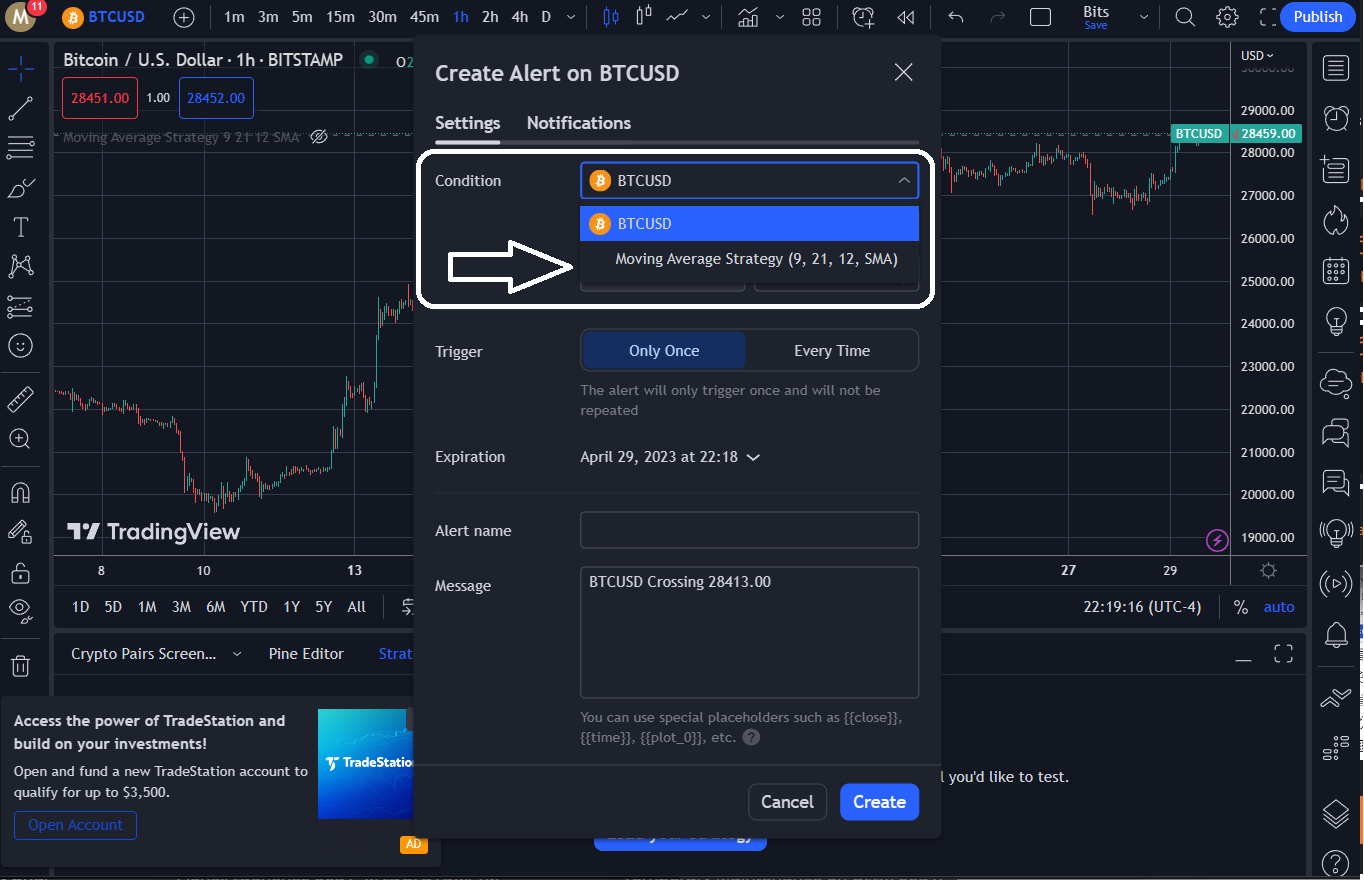
- Next, we need to copy the message from Pionex that specifies the order functionality to be sent from TradingView to the Pionex Exchange. To do this, simply copy the message from the corresponding section on the Pionex page.

- Now, let’s add this message to TradingView

- Next, navigate to the ‘Notifications’ section and select the ‘WebHook’ option

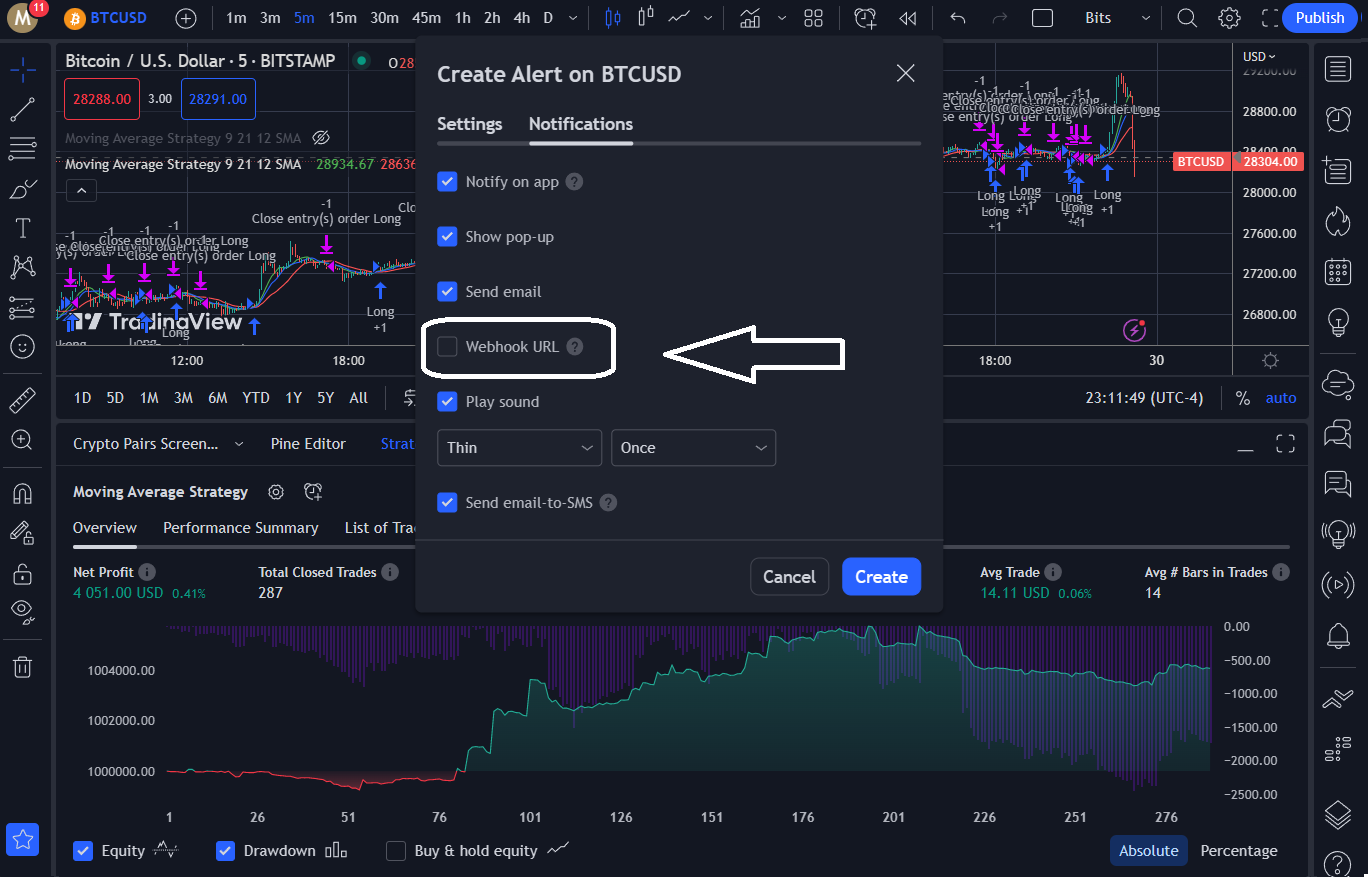
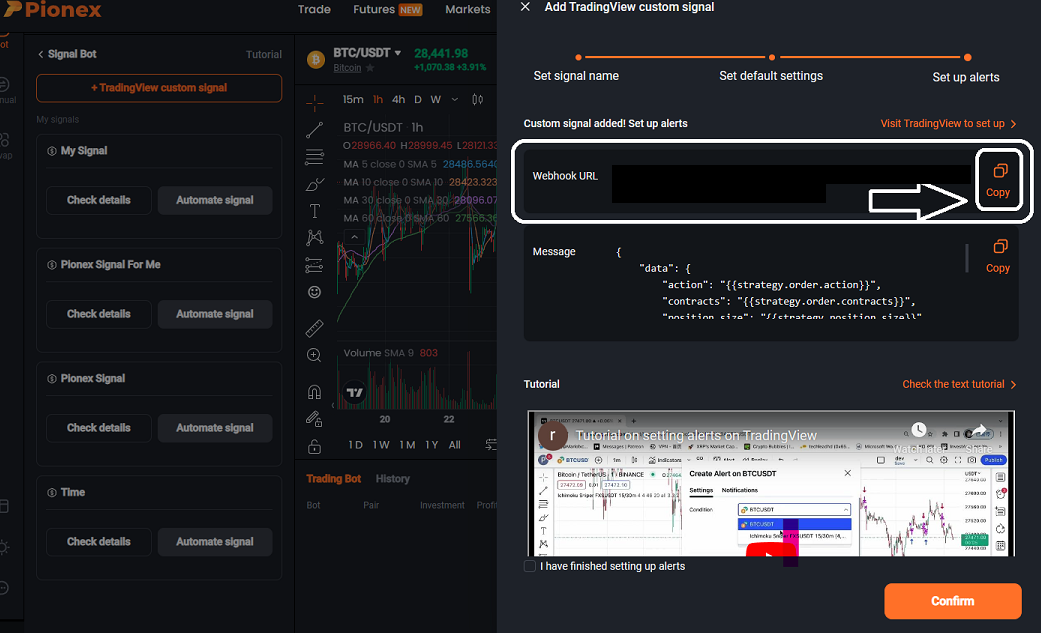
- Next, return to the Pionex Trading Platform and copy the webhook URL from the ‘WebHook URL’ field. Then, paste the URL into the corresponding field in your webhook provider’s settings.
- Important: Do not treat the 100 USD shown in the screenshot below as a universal live-trade amount. The required strategy settings depend on the Signal Bot script you use. Follow the current Pionex Signal Bot and TradingView setup guide, and verify how your order-size setting maps to the funds allocated to your bot before enabling live trading.

Congratulations! You are now equipped to become an automated PineScript trader on the top-rated crypto trading platform, Pionex. Once you have a profitable strategy, share it with others. Even better, let others copy your trading strategy. You can easily list your trading bot on the Pionex TradingView Marketplace.
Interested users can subscribe to your bot for free or even pay a price that you set yourself. You get to keep all the revenue generated by your subscribers. To list your bot on the Pionex Marketplace, simply reach out to [email protected].
